Logo
  • Balcony Law
  • About us
  • Inspection services
  • FAQ
  • Blog
  • Call us ‪+1 818-806-7885
  • Book now

Month: October 2026

Concrete Spalling: What It Is and Why It Matters

Posted on October 2, 2026 by Apex Balcony admin
Concrete Spalling: What It Is and Why It Matters

Table of Contents

  • What Is Concrete Spalling
    • How Spalling Differs from Other Concrete Damage
  • Primary Causes of Concrete Spalling
    • Freeze-Thaw Cycles and Moisture Infiltration
    • Reinforcement Corrosion and Rebar Oxidation
    • Poor Installation and Curing Techniques
  • Signs of Structural Concrete Failure You Should Not Ignore
  • Why Concrete Spalling Matters for Structural Integrity
    • Progressive Deterioration and Safety Risk
  • SB 326 Balcony Inspection Requirements and Spalling Detection
  • Concrete Spalling Repair Cost and Your Options
    • DIY vs. Professional Repair Threshold
    • Preventative Maintenance Schedule
  • Frequently Asked Questions

Last Updated: October 1, 2026

What Is Concrete Spalling

Concrete spalling is the process where the surface layer of concrete breaks away, exposing the underlying material and reinforcement beneath. When concrete spalls, chunks of the outer surface flake, chip, or peel off in fragments ranging from small surface pits to large chunks that compromise structural integrity.

Once spalling begins, it accelerates: water penetrates deeper, freeze-thaw cycles intensify damage, and exposed reinforcement steel corrodes, creating a deterioration cycle that affects the entire structural system.

Concrete spalling is an early warning sign of serious structural problems. Many property owners confuse it with normal aging, allowing water to penetrate deep into the structure, corroding rebar and compromising load-bearing capacity.

How Spalling Differs from Other Concrete Damage

Delamination occurs when concrete layers separate internally without visible surface damage, detected by hollow sounds when tapping. Surface scaling is thin-sheet loss from salt exposure or improper curing.

Spalling exposes aggregate and reinforcement, penetrating inches deep, unlike scaling’s millimeter-level loss or delamination’s hidden internal separation. This visibility enables early detection.

Repair strategy differs: scaling requires protective coating, delamination needs epoxy injection, and spalling demands immediate intervention to prevent rapid reinforcement corrosion.

Primary Causes of Concrete Spalling

Concrete spalling results from specific environmental stresses and construction defects. Understanding root causes enables preventative maintenance before repairs become expensive.

What Causes Concrete Spalling? Identify And Prevent Chipping, Pitting And Flaking Quicker And Easier

CoverTec Products

Freeze-Thaw Cycles and Moisture Infiltration

The most common cause in winter climates is the freeze-thaw cycle. Water enters through cracks and pores, then expands roughly 9% when frozen, creating internal pressure that forces the surface to break away.

Water enters through surface cracks, poor sealants, inadequate drainage, and capillary action. Trapped in concrete pores, it expands with each freeze cycle and penetrates deeper with each thaw, causing cumulative damage visible as spalling.

Spalling appears most frequently on horizontal surfaces like balconies, decks, and stairs that collect and hold water. Severity depends on concrete porosity and water access to reinforcement.

Reinforcement Corrosion and Rebar Oxidation

Steel reinforcement is protected by concrete’s alkaline environment, which creates a protective oxide layer. When water and oxygen reach the rebar through cracks or spalling, corrosion begins immediately.

Rebar oxidation produces rust occupying three to four times the original steel volume. This expansion forces concrete outward, creating a self-reinforcing cycle: spalling exposes more rebar, which corrodes faster, causing more spalling.

In dry climates, corrosion progresses slowly. In coastal areas or regions using deicing salts, chloride ions accelerate rebar corrosion dramatically. Once visible spalling appears, reinforcement is often already significantly compromised.

Poor Installation and Curing Techniques

Concrete mixed with excess water, a common shortcut, has higher porosity and lower strength, absorbing water readily and failing faster under freeze-thaw stress.

Improper curing, drying too quickly, removing blankets early, or exposing concrete to temperature swings, creates weak, porous concrete. Poor finishing techniques also create weak surface layers prone to spalling.

Inadequate air entrainment is another common defect. Properly entrained concrete contains air bubbles that provide expansion space during freeze-thaw cycles. Without them, concrete is extremely vulnerable to spalling.

Signs of Structural Concrete Failure You Should Not Ignore

Spalling progresses in visible stages. Early detection matters because repair costs escalate sharply once corrosion of the reinforcement begins. The signs start subtle and become unmistakable if you know what to look for.
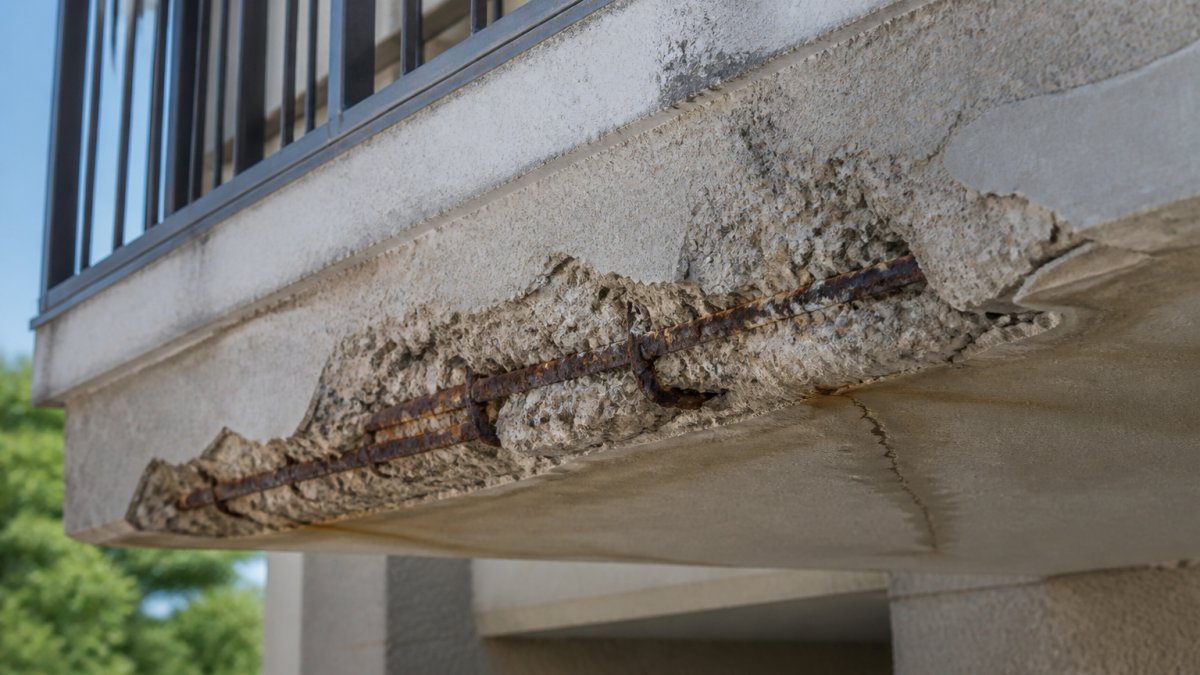
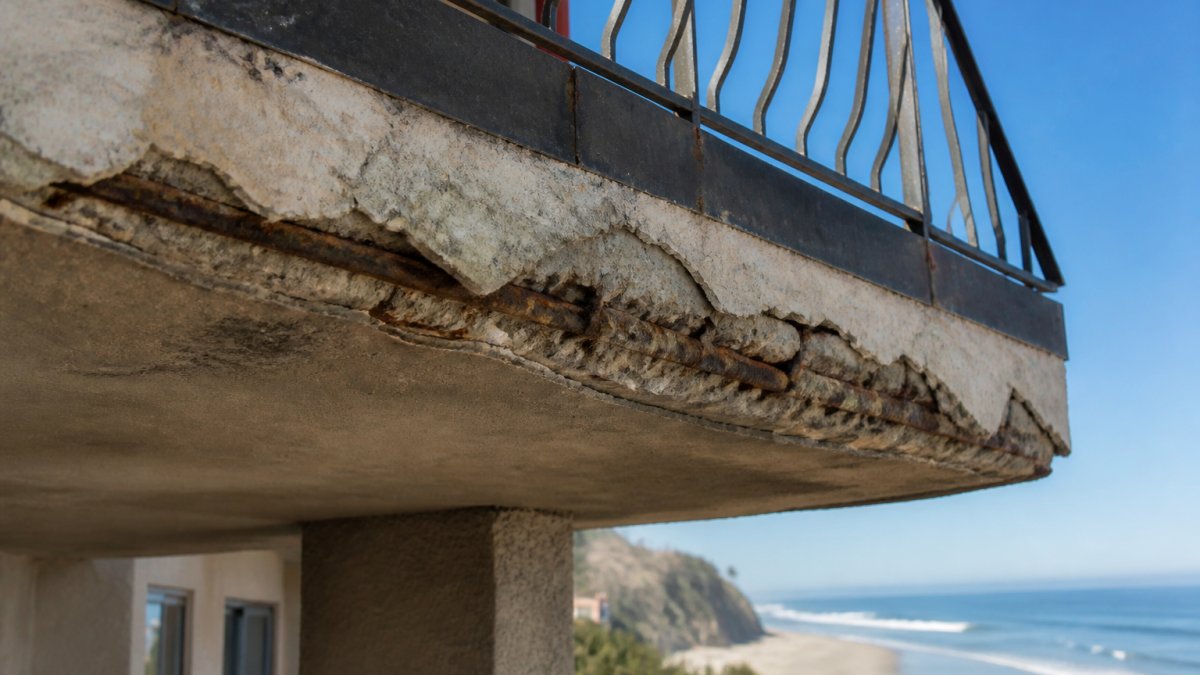
Close-up of concrete balcony surface showing visible spalling with chunks of concrete flaking away, exposing aggregate and rust-stained reinforcement steel, natural outdoor lighting

Surface flaking and small chips are first indicators, light-colored fragments or small pits signal water penetration and early freeze-thaw stress.

Advanced spalling shows larger chunks missing, visible aggregate, rust staining indicating rebar corrosion, soft or crumbly substrate, and radiating cracks suggesting active internal pressure.

Hollow sounds when tapping indicate internal delamination. Combined with visible spalling, this suggests advanced deterioration. Water damage around adjacent windows or doors indicates water penetration into the building interior.

Book inspection →

These signs demand professional assessment. Surface spalling that’s limited to a few small areas might be addressed with patching and sealing. Spalling that covers large areas, exposes significant rebar, or shows signs of active corrosion typically requires concrete removal and replacement or epoxy injection of the damaged area.

Why Concrete Spalling Matters for Structural Integrity

Spalling isn’t just an aesthetic problem. It directly compromises the structural system that holds the building safe. The concrete substrate provides the primary load path for balconies, decks, and elevated elements. Once spalling exposes and corrodes the reinforcement, load-bearing capacity decreases.

The structural concern escalates quickly. A small spalled area reduces load capacity locally. Multiple spalled areas or spalling that extends across a significant portion of a structural element can reduce the element’s capacity below the loads it actually carries. This creates a safety risk: the balcony or deck may no longer safely support the weight of occupants and furnishings.

Water infiltration through spalled concrete also affects adjacent structural elements. Water running through a spalled balcony can saturate the concrete floor slab behind it, corroding reinforcement in the floor system itself. Water can penetrate into the building interior, damaging insulation, finishes, and creating conditions for mold growth. The structural damage extends beyond the visible spalling.

Progressive deterioration accelerates once spalling begins. Each season of freeze-thaw cycles, each rainfall, each exposure to moisture worsens the damage. Repair costs that might have been modest when spalling was first detected become substantial once corrosion has progressed significantly.

Progressive Deterioration and Safety Risk

The danger of spalling is that it’s progressive. Unlike a single structural failure event, spalling develops gradually, and the damage compounds. Initial surface spalling might seem minor. But if left unaddressed, that small area becomes the entry point for water penetration that corrodes reinforcement across a much larger area of the structure.

Safety risk emerges when structural capacity drops below actual loads. A balcony designed to safely support 40 pounds per square foot of occupant load might, after significant spalling and corrosion, safely support only 25 pounds per square foot. This creates a latent hazard: the balcony appears functional but is no longer safe.

The 2015 Berkeley balcony collapse and the May 2021 Malibu incident demonstrated the consequences of unaddressed spalling and corrosion. These failures didn’t happen suddenly, they resulted from years of water infiltration, rebar corrosion, and progressive concrete deterioration. By the time visible failure occurred, the structural damage was catastrophic.

SB 326 Balcony Inspection Requirements and Spalling Detection

California’s SB 326 law requires that buildings with three or more units have balconies, decks, and exterior stairs inspected by a licensed structural engineer or architect. The inspection must assess structural integrity and identify defects that affect safety. Spalling is one of the primary defects that triggers repair requirements under SB 326.

The law mandates that any element found to be in a state of disrepair must be repaired or replaced. Spalling that exposes reinforcement is considered a state of disrepair. Even spalling that hasn’t yet exposed rebar must be evaluated for the extent of water penetration and corrosion risk. The inspection process identifies which spalled areas require immediate repair and which can be monitored.

Property owners have specific timelines under SB 326. Structural defects must be reported to residents, and a repair plan must be submitted to the local building department. Repairs must be completed within the timeframe specified by the local jurisdiction, typically 6 to 24 months depending on severity. Non-compliance can result in fines and liability for injuries resulting from the defective condition. Proactive property management requires a consistent inspection protocol to identify structural defects before they escalate into costly legal or safety liabilities.

SB 326 compliance requires professional assessment by someone qualified to evaluate concrete deterioration and structural implications. This is where professional inspection services become essential. A qualified inspector can distinguish between cosmetic surface damage and structural defects requiring repair, assess the extent of reinforcement corrosion, and recommend appropriate repair strategies.

Concrete Spalling Repair Cost and Your Options

Repair costs for concrete spalling vary dramatically based on the extent of damage, the area affected, and the repair method chosen. A small spalled area on one balcony might cost a few hundred dollars to patch. Spalling that affects multiple units or requires removal and replacement of concrete sections can easily exceed tens of thousands of dollars.

The repair cost depends on several factors: whether the spalling is limited to surface areas or extends deep into the concrete, whether reinforcement is exposed and corroded, the size of the affected area, and accessibility for repair work.

DIY vs. Professional Repair Threshold

Small surface spalling might seem like a DIY project. Cleaning out the damaged concrete, applying a concrete patching compound, and sealing the repair is straightforward work. However, DIY repair of concrete spalling carries real risks.

Preventative Maintenance Schedule

Preventing spalling is far more cost-effective than repairing it. A preventative maintenance program addresses the root causes: moisture infiltration and freeze-thaw stress.


Frequently Asked Questions

What is the most common cause of concrete spalling?

Freeze-thaw cycles combined with moisture infiltration cause the majority of concrete spalling cases. Water enters the concrete through cracks or poor curing, then freezes and expands during winter months, creating internal pressure that forces the surface to break away. In buildings with steel reinforcement, chloride ion penetration and rebar oxidation also trigger spalling as the expanding rust pushes against the concrete substrate.

How serious is concrete spalling and does it lead to structural failure?

Concrete spalling progresses from a cosmetic issue to a structural concern if left untreated. Early surface pitting and flaking may seem minor, but as spalling deepens, it exposes rebar and compromises compressive strength. In elevated elements like balconies, this deterioration accelerates structural failure risk. The 2015 Berkeley balcony collapse and 2021 Malibu incident underscore how spalling left unaddressed can have fatal consequences.

Can concrete spalling be fixed, and what does repair typically involve?

Yes, concrete spalling can be repaired, but the approach depends on severity and location. Surface scaling and minor pitting may respond to patching compound or concrete repair mortar applied to the damaged area. Deeper spalling affecting reinforcement may require epoxy injection, bonding failure correction, or removal and replacement of the affected section. Professional assessment determines whether repair is sufficient or if replacement is necessary.

What should I look for when inspecting my property for signs of structural concrete failure?

Watch for surface flaking, exposed aggregate, visible rebar, water staining, and cracks radiating from spalled areas. On balconies and decks, pay close attention to edges, undersides, and areas near railings where water tends to collect. Soft or crumbling concrete when probed, efflorescence (white powder deposits), and uneven surfaces are all warning signs. If you suspect spalling, a licensed structural inspector can provide a detailed assessment.
Book inspection

Posted in BlogTagged concrete spalling, concrete spalling repair cost, sb 326 balcony inspection requirements, signs of structural concrete failure, what is concrete spalling and why it matters

Why Balcony Structural Decay Happens in Coastal Areas

Posted on October 1, 2026 by Apex Balcony admin
Why Balcony Structural Decay Happens in Coastal Areas

Table of Contents

  • How Salt-Laden Air Accelerates Balcony Structural Decay
  • Moisture Intrusion and Water Seepage in Coastal Environments
  • Corrosion of Metal Components and Fasteners
  • Signs of Dry Rot in Exterior Decks and Load-Bearing Joists
  • SB 326 Balcony Inspection Requirements and Safety Compliance
  • Cost of Balcony Structural Inspection and What to Expect
  • Preventative Maintenance and Early Detection Strategies
  • Frequently Asked Questions

Last Updated: October 1, 2026

How Salt-Laden Air Accelerates Balcony Structural Decay

Salt-laden air is one of the primary culprits behind balcony structural decay in coastal environments. When salt spray from ocean water becomes airborne and settles on metal components, concrete, and wood, it initiates a cascade of corrosion and deterioration that compounds over time. This process doesn’t happen overnight, it’s gradual, relentless, and often invisible until significant damage has already occurred.

The chemistry is straightforward: airborne chlorides penetrate protective coatings and bind to metal surfaces, creating an electrochemical reaction that breaks down the material. Galvanized steel, which is common in balcony construction, offers some resistance, but even galvanized components succumb to salt spray exposure over years. Wood absorbs salt-laden moisture, leading to swelling, shrinkage, and eventual dry rot. Concrete experiences similar salt intrusion, which corrodes embedded rebar and accelerates structural failure.

Apex Balcony has worked with hundreds of building owners. The closer a property sits to the ocean, the more aggressive the environment becomes. Buildings within a quarter-mile of the shoreline face the most severe conditions.

Prevention starts with understanding your micro-climate. A building on a cliff overlooking the Pacific faces different salt exposure than one a mile inland. Wind patterns, building orientation, and surrounding structures all influence how much salt spray reaches your balcony. Identifying your specific exposure level is the first step toward effective maintenance.

Moisture Intrusion and Water Seepage in Coastal Environments

Moisture intrusion is the second major driver of balcony structural decay, and it works in tandem with salt exposure to accelerate failure. Water seepage penetrates the building envelope through cracks, failed sealants, and gaps in flashing. Once inside, moisture becomes trapped within the structural assembly, creating conditions for rot, corrosion, and mold growth.

Coastal environments amplify this problem. Higher humidity, frequent fog, and salt spray-laden moisture create persistent dampness that inland properties rarely experience. Water doesn’t simply evaporate, it lingers, soaking into wood joists, concrete, and the spaces between structural components. The combination of salt and moisture is particularly destructive: salt accelerates corrosion while moisture keeps the metal surface wet enough for the reaction to continue.

Flashing failures are the most common source of water seepage in balconies. Flashing is the metal or rubber seal that directs water away from the building. When flashing deteriorates, cracks, or pulls away from the structure, water runs directly into the assembly below. Over time, this water seeps into ledger boards, joists, and the rim joist, the critical load-bearing components that hold the balcony to the building.

Sealants around penetrations, joints, and edges are equally important. Coastal UV exposure and salt spray degrade sealants faster than in mild climates. A sealant that might last 10 years inland may fail in 5-7 years at the coast. Once sealants fail, water finds its way into every gap.

The real danger emerges when moisture reaches the ledger board, the horizontal member that attaches the balcony to the house. If water intrudes here and remains trapped, the wood begins to rot from the inside out. By the time visible damage appears on the surface, significant structural compromise may already exist.

Corrosion of Metal Components and Fasteners

Metal corrosion is the third pillar of coastal balcony failure. Balconies rely on metal fasteners, brackets, handrails, and reinforcement to function safely. In coastal environments, these components corrode at accelerated rates, losing structural capacity and integrity.

Galvanized steel is the standard for coastal construction because it offers better corrosion resistance than bare steel. However, galvanizing is not permanent. Salt spray and chloride exposure gradually break down the zinc coating, exposing the underlying steel to rust. Once rust begins, it accelerates, rust is porous and traps moisture, creating a cycle of continued corrosion.

Stainless steel offers superior corrosion resistance but is expensive and not universally used. Some builders cut corners by using standard galvanized fasteners in coastal applications. These fasteners corrode within 5-10 years, weakening the connections that hold the balcony together.

Handrails, brackets, and support posts face the same threat. Corroded fasteners lose their grip. Corroded metal loses thickness and strength. A bracket that was once capable of supporting 500 pounds of lateral force might only handle 300 pounds after years of corrosion. This degradation is invisible from ground level but critical to safety.

Metal oxidation also creates expansion problems. As steel rusts, it expands. This expansion can crack concrete, push against adjacent materials, and create stress points that lead to failure. The rust itself is weaker than the original steel, making the corroded area a point of structural weakness.

Book inspection →

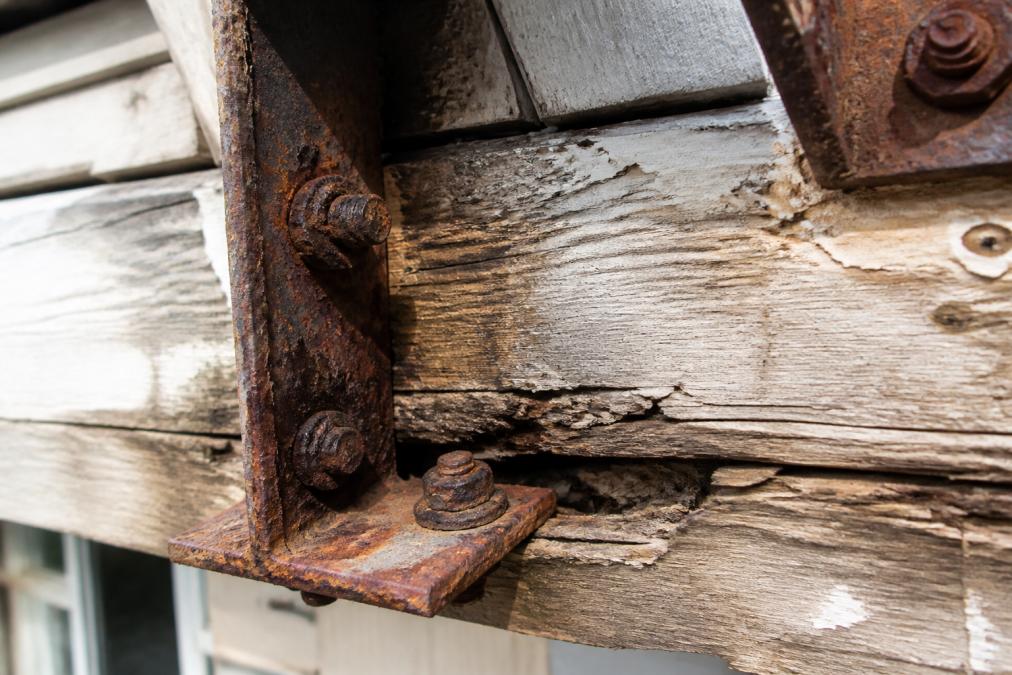
Close-up of heavily corroded metal bolts and brackets on a coastal balcony structure showing rust discoloration and material loss, with weathered wood framing visible in background

Signs of Dry Rot in Exterior Decks and Load-Bearing Joists

Dry rot is the term commonly used for wood decay in exterior structures, though the wood is rarely truly “dry”, it’s usually damp enough to support fungal growth. Dry rot begins when wood moisture content exceeds 20-25%, which is common in coastal environments. Fungal spores germinate, spread through the wood, and break down the cellulose that gives wood its strength.

The early signs are subtle. Discoloration appears first, wood turns darker or develops a grayish cast. The surface may feel soft or spongy. Paint may blister or peel because the underlying wood is moving as it swells and shrinks with moisture changes. Cracks may appear in a distinctive cube-like pattern as the wood shrinks.

By the time structural failure becomes obvious, significant decay has usually occurred. A joist that looks solid on the surface may be 50% compromised internally. When load-bearing joists fail, the entire balcony is at risk of collapse.

Load-bearing joists are the horizontal members that span from the ledger board to the outer rim joist, supporting the weight of the deck and occupants. These are among the most critical components. If they fail, the balcony fails. Coastal properties must pay particular attention to joist condition because the combination of moisture, salt, and temperature cycling accelerates decay dramatically.

Preventative inspection is essential. A professional inspector can probe suspect wood to assess decay depth and structural capacity. Early detection allows for targeted repairs before failure becomes imminent. Many property owners wait until visible damage appears, by which time repairs are more expensive and the safety risk is higher.

SB 326 Balcony Inspection Requirements and Safety Compliance

California’s Senate Bill 326 (SB 326) mandates structural inspections of exterior elevated elements, balconies, decks, and stairways, on residential buildings with three or more units. The law applies to properties constructed before January 1, 2008, and requires inspections to be completed by January 1, 2025, with a five-year cycle thereafter. These mandatory assessments serve as a critical baseline for identifying early signs of deterioration, yet consistent maintenance remains the most effective strategy for preventing exterior damage through the regular removal of salt and moisture buildup.

SB 326 exists because of balcony failures and collapses that resulted in injuries and deaths.

Watch Out
Missing the SB 326 inspection deadline or failing to address identified deficiencies exposes property owners to significant legal and financial liability. If an incident occurs on an uninspected balcony, the property owner’s negligence becomes indefensible.

Cost of Balcony Structural Inspection and What to Expect

The cost of a balcony structural inspection depends on building size, complexity, and accessibility. A professional inspection typically includes a visual assessment of all exterior elevated elements, probe testing of wood for decay, fastener evaluation, and a detailed written report documenting findings and recommendations. Pricing depends on quantity, dates, and delivery. Please visit our website for current prices or a quote.

Pro Tip
Request references from past clients and ask specifically about properties in coastal environments. An inspector with experience in your area understands the unique challenges your building faces and can spot problems early.

Preventative Maintenance and Early Detection Strategies

The most cost-effective approach to managing balcony structural decay is prevention. Preventative maintenance catches problems early, when repairs are less expensive and less disruptive. Early detection also reduces safety risk, a failing balcony that is identified before collapse is far preferable to one that fails unexpectedly.

Visual inspection checklist for property managers:

  • Check flashing and sealants around balcony edges and penetrations
  • Look for paint blistering, cracking, or peeling on wood surfaces
  • Inspect metal handrails and brackets for rust or corrosion
  • Check for water staining or evidence of seepage on the building facade below balconies
  • Look for soft or spongy wood when probing with a screwdriver (light pressure only)
  • Inspect the ledger board connection to the building for gaps or movement
  • Check for visible cracks in concrete or mortar
  • Look for mold, mildew, or algae growth indicating moisture problems

Frequently Asked Questions

How does salt air accelerate structural decay in balconies?

Airborne chlorides from ocean spray deposit on metal fasteners, railings, and structural components, triggering oxidation and corrosion. These salt particles penetrate paint and sealants, exposing steel and galvanized surfaces to accelerated rust formation. Combined with humidity and temperature cycling, salt-laden air weakens the structural integrity of balcony support systems within just a few years.

What are the early warning signs of balcony rot and structural failure?

Look for soft or spongy wood when you press on joists and ledger boards, visible discoloration or darkening of wood surfaces, paint peeling or blistering, rust stains on metal components, water pooling or staining on concrete, gaps between the balcony and house, and visible separation of flashing. Moisture intrusion often causes dry rot to develop inside wood before exterior damage becomes obvious. If you notice any of these signs, a professional structural inspection is essential to assess load-bearing capacity and safety.

Which law applies to my building, SB 326 or SB 721?

SB 326 applies to residential buildings with three or more units built before January 1, 2008, and requires inspection of balconies and exterior elevated elements. SB 721 applies to the same building types and requires the same inspections. Both laws mandate that you hire a licensed architect, structural engineer, or certified inspector to assess structural integrity and code compliance. Contact your local building department or a licensed inspector to confirm which statute applies to your specific property.

How often should coastal balconies be inspected for structural integrity?

Coastal balconies should be inspected annually by property owners. However, salt spray and humidity accelerate decay, so many coastal property managers conduct professional inspections every 3 to 5 years to catch corrosion and moisture damage early. After major storms, saltwater intrusion events, or visible damage, request an immediate inspection. Preventative inspections are far less costly than emergency repairs or structural replacement.

Book inspection

Posted in BlogTagged balcony structural decay, cost of balcony structural inspection, sb 326 balcony inspection requirements, signs of dry rot in exterior decks, why balcony structural decay happens in coastal areas

How to Communicate Safety Inspection Schedules to Tenants

Posted on October 1, 2026 by Apex Balcony admin
How to Communicate Safety Inspection Schedules to Tenants

Table of Contents

  • Why Communicating Inspection Schedules Matters
  • Understanding SB 326 and SB 721 Compliance Requirements
  • Minimum Notice Periods and Legal Requirements
  • Creating a Landlord Notice of Entry Template
    • Essential Elements Your Notice Must Include
    • Delivery Methods That Ensure Compliance
  • Step-by-Step Process for Scheduling Inspections
    • Step 1: Determine Your Inspection Timeline
    • Step 2: Draft and Customize Your Notice
    • Step 3: Distribute Using Multiple Channels
    • Step 4: Document All Communications
  • How to Handle Tenant Inspection Refusal
  • De-Escalation Strategies and Tenant Communication
    • Digital Communication Compliance and Read-Receipt Documentation
    • Handling Non-Response and Assumed Receipt
    • Tone and Framing in All Communications
  • Common Mistakes to Avoid
    • Pre-Inspection Communication Mistakes
    • Post-Inspection Communication Mistakes (The Critical Gap)
    • Multi-Unit vs. Single-Family Nuances
    • Documentation and Record-Keeping
  • Frequently Asked Questions

Last Updated: September 29, 2026

Why Communicating Inspection Schedules Matters

Safety inspection schedules aren’t optional. They’re required by law, and how you communicate them to tenants sets the tone for the entire process. Poor communication creates friction, missed appointments, and potential legal exposure. Clear, professional notice gives tenants time to prepare and shows respect for their privacy.

Balcony collapses and structural failures have caused serious injuries and deaths (Fatality Narrative: Carpenter Falls from Balcony). Inspections aren’t bureaucratic hurdles, they’re lifesaving requirements.

The difference between smooth inspections and contentious ones almost always comes down to communication. This guide shows you exactly how to communicate safety inspection schedules to tenants in a way that builds trust and ensures compliance.

Understanding SB 326 and SB 721 Compliance Requirements

California’s SB 326 (passed 2018) applies to buildings with three or more units built before January 1, 2008. SB 721 (passed 2020) applies to all residential buildings with exterior elevated elements, regardless of age or unit count. These laws exist because balconies, decks, and stairways deteriorate silently, water damage, rot, and structural failure often become dangerous before they’re obvious.

  • SB 326: Three-plus unit buildings, pre-2008 construction, with exterior elevated elements
  • SB 721: Any residential building with balconies, decks, or exterior stairs
  • Both laws: Require initial inspections and ongoing periodic inspections

Minimum Notice Periods and Legal Requirements

California law requires written notice at least 24 hours before entry (some jurisdictions require 48 hours, check your local code and lease) (leginfo.legislature.ca.gov). Your notice must specify the date, time, reason (safety inspection), estimated duration, contact information, and tenant rights regarding entry refusal. Document everything in writing to create a clear record if disputes arise.

Creating a Landlord Notice of Entry Template

A strong notice of entry template sets expectations, demonstrates professionalism, and protects you legally. Write in plain language, avoiding jargon. Your goal is clarity, not intimidation.

Essential Elements Your Notice Must Include

Your notice needs specific information to be legally sufficient and practically useful:

  • Property address and unit number
  • Inspection date and time window (e.g., “between 9 AM and 12 PM on October 15, 2026”)
  • Reason for entry: “Mandatory safety inspection of exterior elevated elements (balconies/decks/stairs) required by California law”
  • Estimated duration
  • Inspector identification (name, company, license #)
  • Tenant rights (can be present, entry is mandatory)
  • Contact information (phone and email)
  • Date notice is sent

Delivery Methods That Ensure Compliance

Use multiple delivery methods simultaneously to create redundancy and prove good-faith notification. Best practice: certified mail (legal gold standard) + email with read-receipt + text reminder. This creates multiple layers of proof if disputes arise. The extra cost is worth the protection.

Step-by-Step Process for Scheduling Inspections

A clear process prevents confusion and keeps everything organized. Follow these steps to schedule inspections professionally and legally.

Step 1: Determine Your Inspection Timeline

Know your deadlines before notifying tenants. Map out your inspection schedule: initial inspection deadline, periodic inspection intervals (typically every 6 years), any accelerated timelines, and seasonal considerations. Clear timelines prevent scrambling and allow tenants to plan ahead.

Step 2: Draft and Customize Your Notice

Customize your template for each unit with specific dates, times, and inspector names. Avoid vague timing, unclear reasons, missing contact info, threatening language, and complex jargon. Your notice should read like professional communication, not a legal threat.

Step 3: Distribute Using Multiple Channels

Send notice at least 5 business days before inspection using multiple methods: certified mail, email, text reminder, and posted copy. This redundancy ensures receipt and documents your good-faith effort.

Step 4: Document All Communications

Keep records of every notice sent: email copies, certified mail receipts, and delivery dates. Create a simple spreadsheet tracking unit, date sent, method, and confirmation of receipt. This takes minimal time but provides maximum protection.

How to Handle Tenant Inspection Refusal

If a tenant refuses entry, remain calm and professional. Explain the legal requirement, offer to reschedule, and document the refusal in writing. Address privacy or damage concerns directly. Explain what the inspector will and won’t do, and offer to be present. If refusal continues after reasonable attempts, consult legal counsel.

De-Escalation Strategies and Tenant Communication

Difficult tenants don’t start difficult. They become difficult when they feel disrespected or unheard. De-escalation strategies prevent conflict before it starts. In practice, this means using communication methods that are both respectful and legally defensible, especially when tenants don’t respond or claim they never received notice.

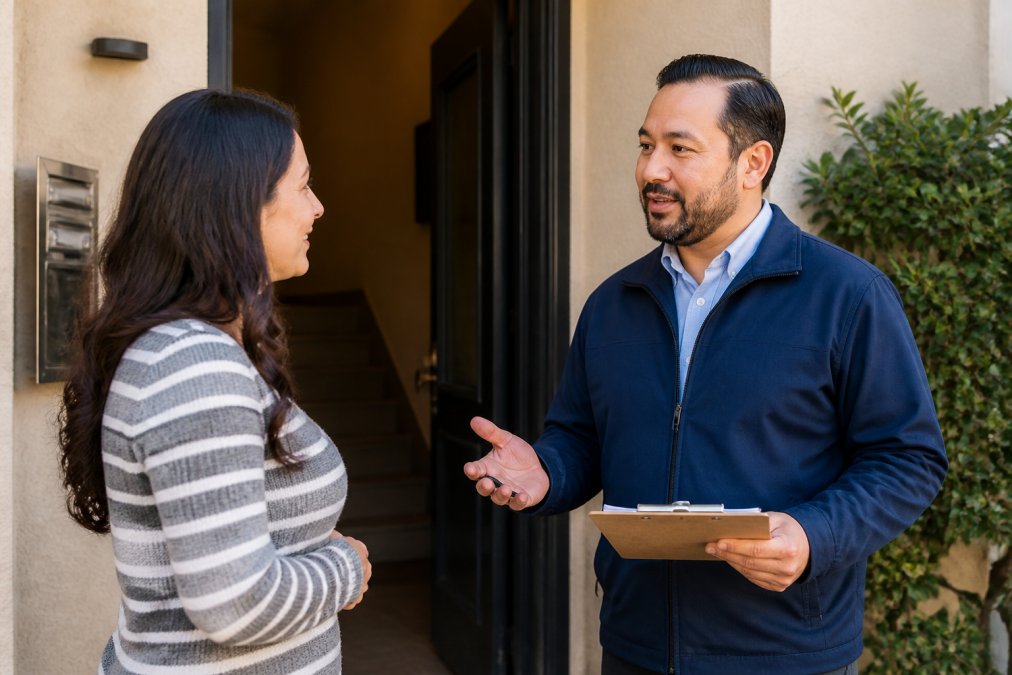
Property manager having a calm, professional conversation with a tenant to explain safety inspection schedules.

Digital Communication Compliance and Read-Receipt Documentation

Email delivery: Send from a professional domain with read-receipt enabled. Use a clear subject line and send during business hours. If unopened within 24 hours, follow up with a phone call. Keep emails archived indefinitely.

Book inspection →

Handling Non-Response and Assumed Receipt

If tenant doesn’t respond: Call 2-3 days before inspection and document the call. Leave a voicemail if unanswered. Proceed with inspection as scheduled after documented good-faith effort. On inspection day, if tenant doesn’t answer, leave a written notice of attempted entry. Consistent follow-up protocols ensure that interior access remains reliable, mirroring the systematic approach required for an exterior maintenance schedule.

Tone and Framing in All Communications

Treat tenants as partners, not adversaries. Listen to concerns before restating requirements. Acknowledge their perspective, explain the safety benefit (not just legal requirement), offer flexible scheduling, and be transparent about what the inspector will do. Follow up after inspection to thank tenants and share findings. Tone matters: “We’re scheduling a safety inspection to protect your building” invites cooperation better than “You are required to allow entry.”

Common Mistakes to Avoid

Learning from others’ mistakes saves time and prevents problems. These are the most common errors in how to communicate safety inspection schedules to tenants, and what to do instead.

Pre-Inspection Communication Mistakes

Insufficient notice: Send at least 5 business days before inspection, not just 24 hours.

Post-Inspection Communication Mistakes (The Critical Gap)

Failing to communicate findings: Send a brief summary within 3 business days. If no issues: “The inspection found no structural concerns. Your balcony is safe.” If issues found: “The inspection identified [specific issue]. We are scheduling repairs for [date].”

Multi-Unit vs. Single-Family Nuances

Communication strategies differ significantly between apartment complexes and single-family rentals.

Apartment complexes (3+ units):

  • You’re managing multiple tenants simultaneously. Send notices to all units on the same schedule to avoid confusion and complaints about favoritism.
  • Use a property management system (AppFolio, Buildium, etc.) to track notices and confirmations across all units. This prevents missed units.
  • Post a notice in the common area (lobby, mailroom) in addition to unit-specific notices. This reminds tenants and shows transparency.
  • Hold a brief tenant meeting or send a group email explaining the inspection schedule, why it matters, and what to expect. This reduces anxiety and questions.
  • Assign a single point of contact (property manager or leasing office) for all inspection-related questions. Tenants should know who to call.

Single-family rentals:

  • You’re dealing with one tenant per property. Personalization matters more. Use the tenant’s name in communications. Offer flexible scheduling.
  • Call the tenant directly (not just email) to confirm the inspection date. This personal touch reduces no-shows and refusals.
  • If the tenant has special needs (elderly, mobility issues, language barrier), accommodate them. Offer to reschedule if the proposed time is genuinely inconvenient.
  • After the inspection, follow up with a phone call, not just an email. Tenants appreciate the personal touch and are more likely to cooperate with future inspections.

Documentation and Record-Keeping

The most common mistake across all property types: poor documentation. If a dispute arises, your records are your defense.

What to document:

  • Date and method of notice delivery (certified mail receipt, email with read-receipt, text message thread, phone call log)
  • Tenant response or non-response
  • Any tenant questions or concerns and how you addressed them
  • Inspection date, time, and inspector name
  • Inspection findings (summary, not full report)
  • Any tenant refusal or access issues
  • Post-inspection communication (findings summary, repair timeline, follow-up)
  • Repair completion date and confirmation

How to document:

  • Use your property management software if available. Most platforms have built-in communication and document storage.
  • If you don’t use software, create a simple folder (digital or physical) for each property. Store all notices, receipts, emails, and notes in chronological order.
  • For phone calls, make brief notes immediately after: “Called tenant on [date] at [time]. Confirmed inspection scheduled for [date]. Tenant had no questions.”
  • For in-person conversations, follow up with an email summarizing what was discussed: “Per our conversation today, the inspection is scheduled for [date] at [time]. Please confirm by replying to this email.”

Frequently Asked Questions

How much notice is required to communicate safety inspection schedules to tenants?

Most jurisdictions require a minimum of 24 to 48 hours’ written notice before entry for inspections, though some lease agreements or local statutes may require more. Your specific notice period depends on your state statutes and lease agreement terms. Always check your local landlord-tenant law and review your lease to confirm the exact requirement. Providing more notice than legally required demonstrates good faith and reduces tenant friction.

What information must be included in a formal inspection notice?

Your notice should include the specific date and time window of the inspection, the reason for entry (safety inspection, maintenance, etc.), which areas will be inspected, who will conduct the inspection, and how tenants can request access accommodations. Include your contact information and instructions for tenant questions. For SB 326 and SB 721 compliance inspections, specify that the inspection is required by state law. A clear, professional notice reduces misunderstandings and builds tenant confidence.

Can a tenant refuse a mandatory safety inspection?

Tenants cannot legally refuse a mandatory safety inspection required by state law, such as SB 326 or SB 721 balcony inspections. However, they can request reasonable accommodations (different time, access through another entrance). If a tenant refuses without legitimate cause, document the refusal in writing, send a follow-up notice citing the legal requirement, and consult your attorney about enforcement steps. Most tenants cooperate when they understand the inspection is legally mandated and non-negotiable.

What delivery methods ensure my inspection notice is legally compliant?

Use multiple delivery methods to ensure compliance: certified mail with return receipt, email with read receipt, personal delivery with a signed acknowledgment, or posting on the unit door with photographic documentation. For multi-unit properties, post notices in common areas and deliver individually. Certified mail provides the strongest legal proof. Document which method you used for each tenant. Combining methods ensures tenants receive notice and protects you if disputes arise.

Book inspection

Posted in BlogTagged how to communicate safety inspection schedules to tenants, how to handle tenant inspection refusal, landlord notice of entry template, sb 326 and sb 721 compliance requirements

Posts navigation

Newer posts

Recent Posts

  • 7 Ways to Prevent Balcony Wood Rot Under SB 721
  • What Does an SB 721 Inspection Actually Cost Versus Repairs?
  • 7 Balcony Collapse Causes and How to Prevent Them
  • What Does Preventative Maintenance for EEE Compliance Require?
  • 7 Steps to Document Balcony Inspections for SB 326 Compliance

Recent Comments

No comments to show.

Archives

  • October 2026
  • September 2026
  • August 2026
  • July 2026
  • June 2026

Categories

  • Blog
Logo
Created by Unilime.Group
  • Balcony Law
  • About us
  • Inspection services
  • FAQ
  • Blog

Call us ‪+1 818-806-7885‬
License: CSLB #1101305

Apex Balcony Inspection
‪+1 818-806-7885‬
[email protected]
4645 Van Nuys Blvd #201
Sherman Oaks CA 91403

Created by Unilime.Group