Identify Dry Rot in Wooden Balcony Supports: Step-by-Step
Identify dry rot balcony: Learn how to identify dry rot in wooden balcony supports with visual signs, testing methods, and safety protocols. Protect your.
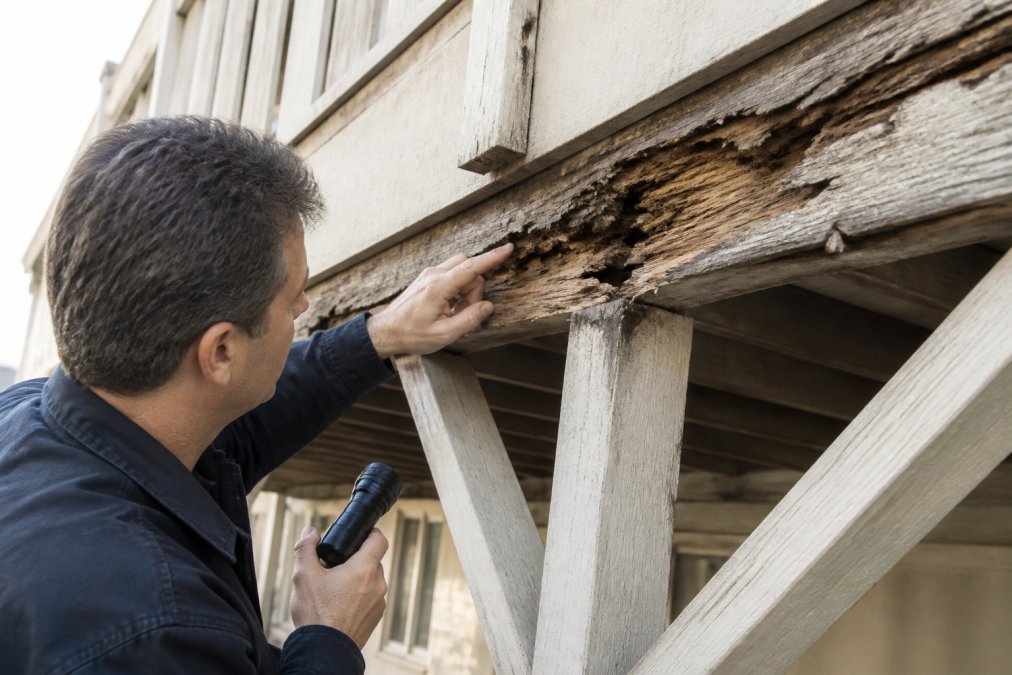
Table of Contents
- What Is Dry Rot and Why It Threatens Balcony Structures
- Visual Signs of Dry Rot in Balcony Supports
- How to Test Wood for Rot with a Screwdriver
- Dry Rot vs Wet Rot Identification
- Inspecting Ledger Boards and Load-Bearing Joists
- California SB 721 Balcony Inspection Requirements
- Safety Protocols for DIY Structural Assessment
- When to Call a Professional Inspector
Last Updated: August 4, 2026
What Is Dry Rot and Why It Threatens Balcony Structures
Dry rot is a destructive fungal decay that attacks wood in low-moisture environments, leaving timber brittle and structurally compromised. At Apex Balcony, we’ve inspected hundreds of California buildings where dry rot in wooden balcony supports went undetected for years, creating serious safety risks. The fungus responsible, Serpula lacrymans, thrives in wood with moisture content between 20-30%, paradoxically lower than the 40%+ moisture needed for wet rot. Balconies are particularly vulnerable because they experience repeated wetting from rain and snow followed by partial drying, creating the exact moisture band where dry rot flourishes.
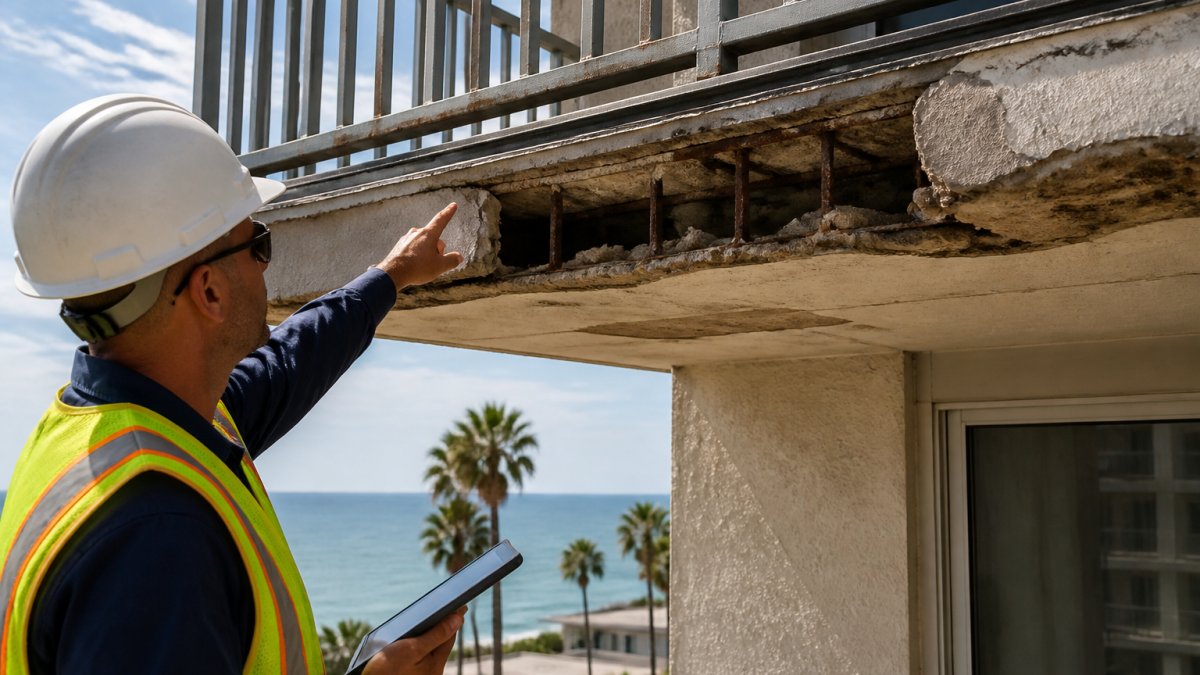
In California, this threat has legal teeth. According to California Building Standards Commission SB 721 requirements, residential buildings with three or more units must have all exterior elevated elements inspected by a licensed professional every six years. Balcony collapses in Berkeley (2015) and Malibu (2021) demonstrated the catastrophic consequences of missed structural decay. When dry rot compromises ledger boards and load-bearing joists, the entire balcony system can fail suddenly, putting residents at risk and exposing building owners to massive liability.
Early identification is your first line of defense. The fungus produces visible fruiting bodies, distinct discoloration patterns, and characteristic wood deterioration that trained inspectors can spot. Property managers who catch dry rot early can often address it before repair costs escalate into six figures.
Visual Signs of Dry Rot in Balcony Supports
The first step in identifying dry rot in wooden balcony supports is recognizing the visual markers that indicate fungal decay is underway.
Discoloration and Surface Changes
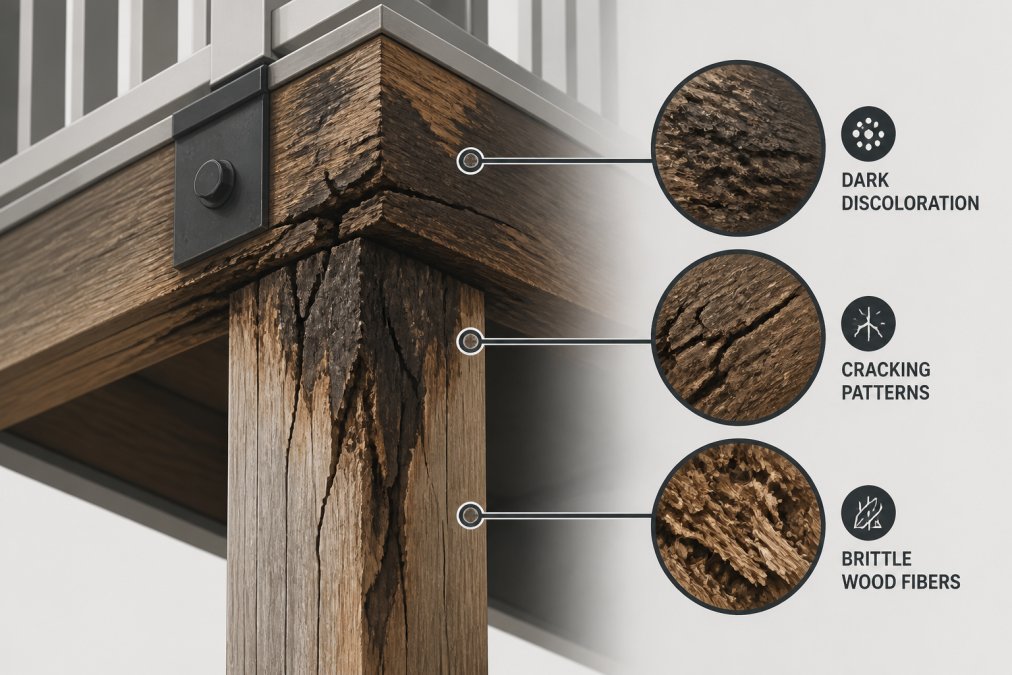
Infected wood develops distinctive color shifts from surrounding timber. Early-stage dry rot appears as dark brown or reddish-brown discoloration in irregular patches. As decay progresses, the wood can lighten to pale tan or grayish-brown, creating a mottled appearance.
The surface texture changes too. Dry rot causes wood fibers to break down, leaving the surface crumbly, flaking, or peeling in layers. Fine cracks running perpendicular to the grain indicate shrinkage caused by water loss as the mycelium consumes the wood structure. In advanced decay, the wood surface becomes papery and can be scraped away with a fingernail.
Discoloration often follows water infiltration patterns. On ledger boards where flashing fails, you’ll see a concentrated band of dark staining running horizontally. On joists, discoloration concentrates near the ends where wood meets concrete or masonry, junction points that trap moisture and accelerate fungal growth.
A musty odor frequently accompanies visible discoloration. The smell is distinct: earthy, slightly sour, reminiscent of a damp basement. If you notice this odor near balcony supports, it signals that wood-destroying fungi are active.
Fungal Fruiting Bodies and Mycelium Growth
The most definitive visual sign of active dry rot is the presence of fruiting bodies, fungal reproductive structures that appear on or near infected wood. These typically emerge as bracket-shaped or shelf-like growths protruding from the wood surface, ranging from 2-6 inches across with a pale, cream-colored upper surface and rusty-brown or orange underside. Fruiting bodies indicate the fungus has matured and is releasing spores to colonize new wood. Their presence means the timber needs replacement.
Before fruiting bodies appear, mycelium, the thread-like fungal network that does the decay work, may be visible as white, cotton-like strands or fine web-like material. Mycelium growth indicates that fungal decay is actively consuming the wood structure. In advanced cases, you may observe salt-like crystalline deposits on the wood surface, confirming active decay.
How to Test Wood for Rot with a Screwdriver
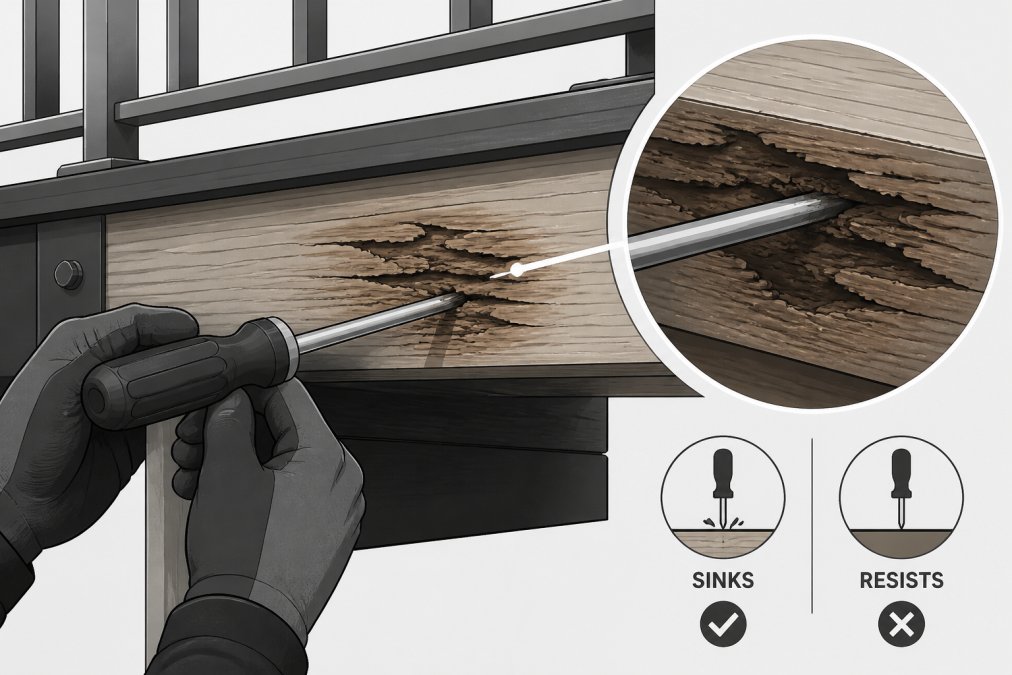
Visual inspection provides initial clues, but a hands-on test using a screwdriver is the most reliable way to assess the structural condition of wooden balcony supports.
The Screwdriver Penetration Test
Use a flathead screwdriver (ideally 1/4 inch wide) to probe the wood surface. In healthy wood, the screwdriver will not penetrate more than 1/4 inch without significant force. In rotted wood, the screwdriver penetrates easily, sometimes sinking an inch or more with minimal pressure. This tells you the wood fibers have lost structural integrity.
Perform this test at multiple points on each suspect timber, top surface, bottom surface, and sides. Dry rot often concentrates at specific locations where water pools or flashing fails, so a timber may be sound in one spot and severely compromised 12 inches away. Document your findings with photographs and notes of penetration depth and location.
Assessing Spongy Texture and Soft Spots
Press firmly on suspect wood with your thumb or palm. Healthy wood feels hard and unyielding. Rotted wood feels spongy, compressible, or soft. Soft spots indicate zones where the fungus has substantially consumed the wood structure. A timber where soft spots cover more than 10-15% of the cross-section is at risk of sudden failure.
Pay particular attention to joist and ledger board ends. These areas are most vulnerable because they sit in or near concrete/masonry, where moisture accumulates. You’ll often find that the outer 2-3 inches of a joist end are severely rotted while the interior timber is still sound. This end decay can reduce the effective depth of the joist, dramatically lowering its load-bearing capacity.
Dry Rot vs Wet Rot Identification
Learning how to identify dry rot requires understanding how it differs from wet rot, because the two fungi demand different remediation approaches.
Dry rot (Serpula lacrymans) thrives in wood with 20-30% moisture content. It can spread through masonry and concrete to reach new wood sources, making it particularly aggressive in multi-story buildings. Dry rot produces visible fruiting bodies, moves rapidly through wood, and can cause structural failure within months if left untreated. The wood becomes brittle and shrinks as the fungus consumes it.
Wet rot (Coniophora puteana and related species) requires constant saturation, moisture content above 40%. It does not spread through masonry and remains localized to the affected timber. Wet rot advances more slowly and typically affects wood that is continuously wet. The wood becomes soft and spongy rather than brittle.
Balcony supports are more likely to develop dry rot because they experience cycles of wetting and partial drying, keeping moisture content in the danger zone (20-30%). Visual identification: dry rot wood is often darker and more brittle; wet rot wood is softer and more spongy. For balcony supports in California, assume dry rot unless the wood is in a state of constant saturation.
Inspecting Ledger Boards and Load-Bearing Joists
Ledger boards and joists are the critical structural elements of a balcony system. The ledger board connects the balcony deck to the building’s main structure, transferring all weight back to the building. Joists span from the ledger board to the outer rim beam, supporting the deck surface. If either fails, the entire balcony can collapse.
Dry rot in these elements is particularly dangerous because damage is often hidden. The top surface of a joist may look sound while the underside, where moisture accumulates and the fungus concentrates, is severely compromised.
Inspect the ledger board first. Look for gaps between the ledger and the building’s rim band, these indicate the ledger has shrunk, a classic sign of dry rot. Check the flashing where the ledger meets the building exterior. Failed flashing allows water to run behind the ledger, saturating the wood. Look for discoloration, soft spots, and screwdriver penetration along the entire length, especially at the ends.
For joists, inspect the top surface, bottom surface, and both ends. Pay special attention to where joists meet the rim beam or ledger board, these connection points trap water and are decay hotspots. Use your screwdriver to probe the end grain. If the wood is soft, the joist’s end connection is compromised.
Check the underside of the deck for water seepage or staining on joists. Water dripping down a joist indicates the deck surface above is allowing infiltration. Look for evidence of standing water or pooling on the deck surface. Poor drainage accelerates rot development.
Measure the depth of any soft spots or decay zones. If a joist has lost more than 1/4 of its cross-sectional depth to rot, its load-bearing capacity is significantly reduced. Building codes typically require that structural members maintain at least 75% of their original cross-section.
California SB 721 Balcony Inspection Requirements
California Senate Bill 721 mandates that residential buildings with three or more units must have all exterior elevated elements, balconies, decks, stairways, inspected by a licensed professional every six years. Inspections must be performed by a person licensed as a structural engineer, general contractor, or architect, or who has specific training in exterior elevated element inspection.
The inspector must document the condition of all structural components and classify findings as either "pass," "fail," or "needs monitoring." Property owners have 30 days from inspection to provide a copy of the report to residents. If the inspection identifies defects that pose imminent danger, the owner must take immediate action to ensure safety.
According to California Building Standards Commission SB 721 compliance guidance, dry rot in load-bearing elements is classified as a defect requiring repair. Non-compliance with SB 721 can result in fines up to $500 per day per violation, plus liability exposure if injury or collapse occurs.
Safety Protocols for DIY Structural Assessment
If you’re conducting a preliminary inspection before calling a professional, follow these safety protocols.
Wear appropriate protective equipment. Use work gloves to protect your hands from splinters and fungal spores. Wear a respirator mask (N95 or better) when probing suspect wood. Wear safety glasses to protect your eyes from wood particles. If the balcony shows severe decay, wear a hard hat.
Never put your full weight on a balcony that shows visible signs of decay. If the deck surface feels soft or spongy, or if joists are visibly rotted, restrict access immediately. Severe dry rot can cause sudden failure.
Test the deck surface carefully. Press down firmly on multiple points with your foot, shifting your weight gradually. If the deck flexes excessively or feels unstable, stop immediately. Excessive flex indicates compromised joists.
Probe suspect wood from a stable position. Use a step ladder or stable platform to reach elevated joists and ledger boards. Never lean precariously or overextend your reach.
Take photographs and detailed notes. Document the location of every soft spot, discoloration patch, and penetration depth. Use a measuring tape to record dimensions. This documentation is invaluable for your professional inspector.
Do not attempt to remove or chip away at suspect wood. Disturbing rotted timber can accelerate collapse. Your goal is observation only.
Understand your liability limits. If you identify severe decay and do nothing, you’ve documented a known hazard. If you identify decay and restrict access pending professional inspection, you’ve taken reasonable precautions. Document your actions.
When to Call a Professional Inspector
The line between preliminary visual inspection and professional structural assessment is clear. Call a licensed professional immediately if you observe:
- Visible fruiting bodies indicating advanced dry rot
- Soft spots covering more than 5% of a joist or ledger board suggesting significant structural compromise
- Screwdriver penetration exceeding 1/2 inch with light pressure indicating substantial decay
- Gaps between the ledger board and the building structure suggesting the ledger has shrunk due to decay
- Failed flashing or evidence of water seepage behind the ledger or into joist ends
- Balcony movement, flexing, or bouncing indicating structural instability (emergency)
- Uncertainty about the extent or severity of decay
Apex Balcony has worked with hundreds of building owners and HOAs across California to conduct comprehensive balcony inspections and identify early signs of structural failure. Our licensed inspectors use decades of combined construction and design experience to assess dry rot and other defects that threaten balcony safety. We provide detailed written reports that document all findings and recommend specific repairs, helping property owners comply with SB 721 and protect their residents.
| Inspection Finding | DIY Assessment | Professional Follow-Up | Urgency |
|---|---|---|---|
| Discoloration or musty odor | Visual observation, note location | Confirm fungal decay, assess extent | Within 2-4 weeks |
| Screwdriver penetration 1/4 inch | Soft spot identified, document | Determine structural impact, repair scope | Within 2-4 weeks |
| Fruiting bodies visible | Advanced decay confirmed, restrict access | Full structural assessment, replacement planning | Immediate (within 1 week) |
| Ledger board gaps or failed flashing | Water infiltration suspected | Assess ledger connection integrity, waterproofing | Within 1-2 weeks |
| Deck flexing or instability | Structural concern noted, restrict access | Emergency assessment, stabilization or closure | Immediate (24-48 hours) |
Dry rot in wooden balcony supports is a silent threat that can compromise structural safety and create significant liability for building owners. Early detection through visual inspection and hands-on testing can catch decay before it becomes catastrophic. Once you’ve identified suspect wood, professional assessment is essential. Apex Balcony provides licensed structural inspections that document all defects, confirm SB 721 compliance, and guide you toward safe, code-compliant repairs. Book an inspection with our team today and protect your residents and your property.
Frequently Asked Questions
What does dry rot in wood look like, and how can I identify it visually?
Dry rot appears as shrunken timber with deep cracking in a cube-like pattern, often accompanied by discoloration ranging from light brown to dark gray. You may see white or gray mycelium growth (fungal threads) on the wood surface, and the affected wood feels brittle and crumbles easily when scraped. A musty odor often indicates active wood-destroying fungi. In balcony supports, look for these signs along ledger boards, joists, and connection points where moisture accumulates.
How do I test wood for rot with a screwdriver to identify dry rot in balcony supports?
Insert a screwdriver or awl perpendicular into the wood grain with moderate pressure. If the tool penetrates more than one-quarter inch easily, the wood has lost structural integrity. Press along the wood fibers as well; if the screwdriver sinks in smoothly rather than meeting resistance, soft spots indicate decay. Repeat testing at multiple locations on joists, ledger boards, and lag bolt connection areas to assess the extent of deterioration and load-bearing capacity loss.
What is the difference between dry rot and wet rot in balcony wood?
Dry rot requires less moisture (12-20% moisture content) and spreads faster, causing wood to shrink, crack in cubes, and become brittle. Wet rot needs higher moisture (above 50%) and grows more slowly, leaving wood soft and spongy without the characteristic cube cracking. Dry rot produces white mycelium and can travel through masonry; wet rot stays localized to wet areas. In balconies, dry rot is more dangerous because it can spread undetected through structural framing before moisture is obvious.
What are California SB 721 balcony inspection requirements, and do they apply to my property?
SB 721 requires annual visual inspections of balconies, decks, and exterior stairs on buildings with three or more residential units. Inspectors must assess structural integrity, water infiltration, fastener corrosion, and deterioration of wood and connections. Defects must be documented and repairs completed within specified timelines. If your building has three or more units and includes elevated exterior elements, SB 721 applies. Non-compliance can result in fines and liability. Contact a licensed inspector to confirm your property's compliance status.
What should I do if my balcony inspection reveals dry rot in load-bearing joists or ledger boards?
Stop using the balcony immediately if structural safety is compromised. Document findings with photographs and written notes. Contact a licensed structural engineer or professional balcony inspector to assess repair scope and urgency. Do not attempt DIY repairs on load-bearing elements; dry rot in joists and ledger boards requires professional replacement or reinforcement to restore load-bearing capacity. Budget for repairs promptly, as deterioration accelerates and can lead to catastrophic failure. Ensure repairs meet current building codes and SB 721 standards.